Interior painted patchy X19 grey over an aluminium base coat. Emergency exit markings are from strips of yellow decal. Raised details were painted a lighter grey while shadows were added with a 0.3mm LED pencil.
Sound proof quilting was made from aluminium foil with the pattern embossed with a blunt needle. Lights in the roof are clear lenses from AK interactive.
Worn effect applied to the cabin area by scratching away the grey to reveal the silver below.
Tuesday, 14 August 2012
Monday, 13 August 2012
1/35 Guntruck Factory Iraq
Weapons mount, in all there will be 4 of these, one mounted in the armoured box, the rest stockpiled on the edge of the diorama. In pictures these appear quite new so weathering was kept to a minimum. The corner of one mount was trimmed so it better fits the diorama, this will make sense once the scene is assembled.
Saturday, 11 August 2012
Friday, 10 August 2012
1/35 Guntruck Factory
The Humvee proved to be a bit thin skinned in Iraq so around 2004 the US army started adding their oven armoured plates manufactured and installed in country.
The shape of the side armour was traced directly off the Tamiya kit and cut from thin Evergreen sheet. Locking catches bent up from brass wire.
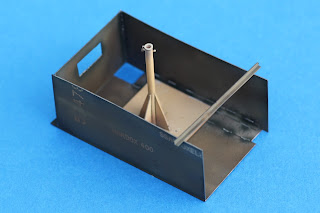
Armoured box that fits into the rear compartment, the end plate is left off implying its only 2/3 built and to allow good visibility into this part of the model.
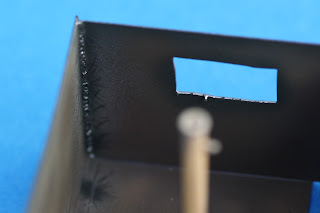
Working closely with reference photos various rusty tones were added as well as the burnt look around each weld.
Armoured box with MG mount test fitted, more on this mount later.
Welds were applied using Milliput and painted to look suitably burnt, just like fresh welds.
Wednesday, 8 August 2012
Super Detailed 1/20 Lotus 25
As a prelude to a Lotus 25 Detail kit i have started detailing the Tamiya kit. Its a great kit but some of he part are a bit clunky.
Huey Bushranger 1/35 - Airframe
The Panda / Dragon fuselage is infamous for its trench like panel lines and over scale rivets so I took the bold step of sanding and filling the entire airframe. The rivets are from Archer and I've gone through around 5 packs, laborious but the results are excellent.
The tail boom was scribed and riveted first and sealed with enamel as a first test. All seemed good so I covered the entire airframe. The cargo compartment hinged doors were overly thick and moulded in clear styrene so they were remade them from scratch.
The underside had many rows of rivets and numerous access panels, these were from Archer as well. Landing skids are from the Academy UH-1C kit made 12mm longer with some similar diameter Evergreen rod.
Some of the quilting is complete inside the cabin. More on this in a forthcoming entry.
Foot pedals are from the Academy kit. Windows are from clear acetate glued into position with Gator Glue.
Monday, 6 August 2012
Huey Bushranger 1/35 - Cargo Doors
The Panda cargo doors had the over sized rivets sanded off and replaced with rivet decals from Archer. These are amazing and fix one of the biggest issues with the Panda / Dragon kit. Ultimately the entire airframe will be re scribed and re riveted ... big job.
2 of the window frames were left empty as on the real thing, this enabled the ground crews to access the refuelling points with the doors secured in the open position. The other 2 windows were from flat acetate sheet, glued into position with Gator Glue before adding a styrene frame.
The elevators are also in this image these will be painted once secured to the tail boom.
Not much of the inside of the doors is visible since they are flat against the airframe, some minor details were added. The styrene pins will attach the doors to the airframe once everything is painted.
Subscribe to:
Posts (Atom)


